Contents
Opportunities Board
The Opportunities Board gives you an overall view of the opportunities available to the business and is primarily used for tracking sales deals. Boards and categories give businesses a flexible and organized structure or manage their sales and lead cards.
Opportunities Boards Fundamentals
Your First System-Generated Board
The very first Opportunity Board is system generated. This board is created depending on the primary location where your business is registered. This board is not editable (the name and the business location cannot be changed) and non-archivable too. The boards that are later added by you can be archived and are editable too.
Organize Your Sales Pipelines With Multiple Boards
Businesses can build multiple boards to manage their opportunities each dedicated to a single location or business entity or revenue operations of your business. Additional boards can be added by the business or user with proper user permissions.
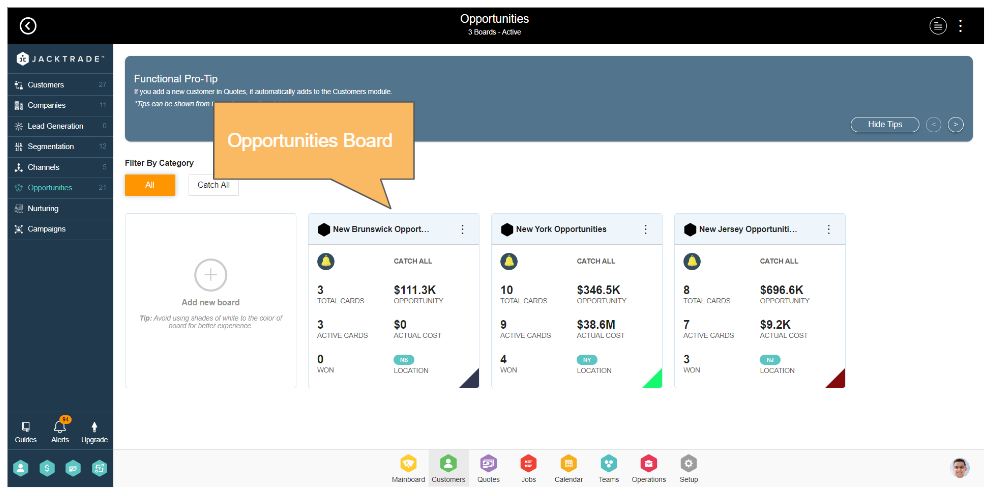
Users can view multiple boards on the main screen of the opportunities module which shows the following statistics per board:
- Total number of opportunities which includes active and archived opportunities in the board.
- The number of active opportunities (cards).
- The total worth of opportunities.
- Actual cost of the opportunities.
- The number of opportunities won.
- A business location that the opportunity board is dedicated to.
Business Locations
When setting up an Opportunity board, it requests which region a board is dedicated to. The regions and currency types are mapped as configured in the business setup and reflected appropriately on the board.
Each card inside the board then gives it the possibility to allocate cards to particular locations within the region.
Board Categories
Board categories are used for better organizing and structuring your opportunities. For example: if you want to focus primarily on certain products or services, or if you are managing different sales funnels, and want to calculate your return of investment per sales funnel.
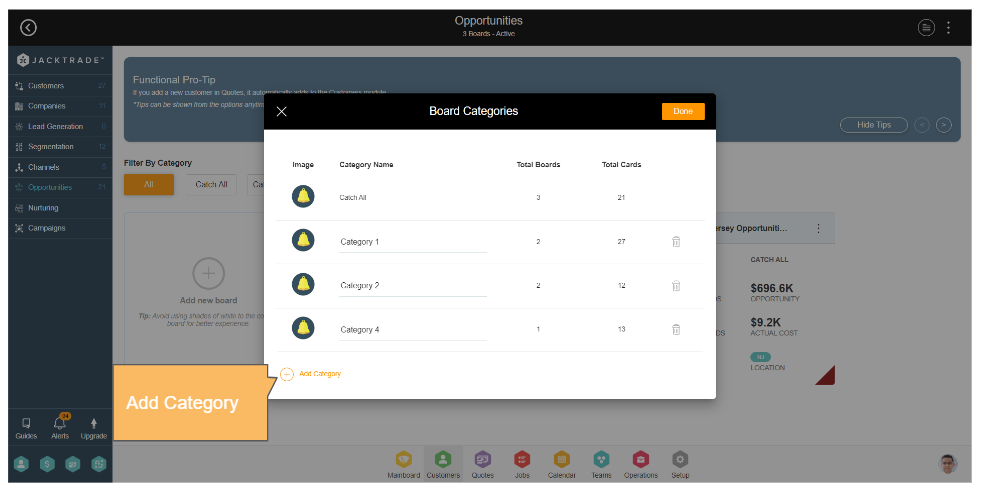
Board Categories are set up globally for the entire Opportunity functions. Users can manage as many categories as they want. The following conditions apply when setting up Board Categories:
- Catch All Category – There is always a “Catch All” default Board Category that is not removable by the user. If the Board Category is removed or disabled from the settings, then all associated boards move automatically to the “Catch All” categories.
- Showing Categories With Data – Only Board Categories show with associated boards. Categories without any boards do not show up unless there is a board associated with that Board Category. This includes “Catch All” for see and no see views.
Creating A New Opportunity Board
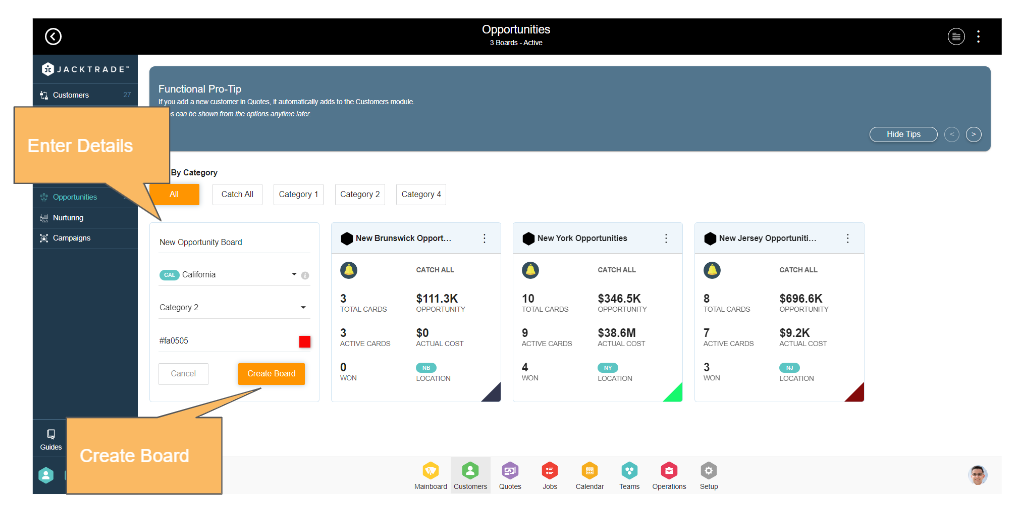
To create a new opportunity board, simply click the ‘Add new board’ card.
Creating An Opportunity Board
In Customer, Opportunities click on add new board card and enter the mandatory fields which are — Add New Board Name, Select Location, Pick a Board Category, Enter Hex or Choose Color, and click create a board to finalize it.
While setting up an Opportunity board, it requests which region a board is dedicated to. The regions and currency symbols are pulled from the business configuration itself and are reflected appropriately on the board. Each card inside the board then gives a possibility to allocate cards to a particular location within the region.
Once you have created a new opportunities board, click the board to enter the Opportunities Pipeline. The Opportunities Pipeline gives an overview of all the cards present in the pipeline.
Getting Started By Adding Opportunity To The Board
In the opportunity board, click on add opportunity where you have mandatory fields for the Title of the opportunity, Customer Name, Sales Agent, Potential Opportunity, and Forecast Close. You can also add tags to the particular opportunity. When the opportunity is created it shows on the opportunity pipeline.
Filters Per Board
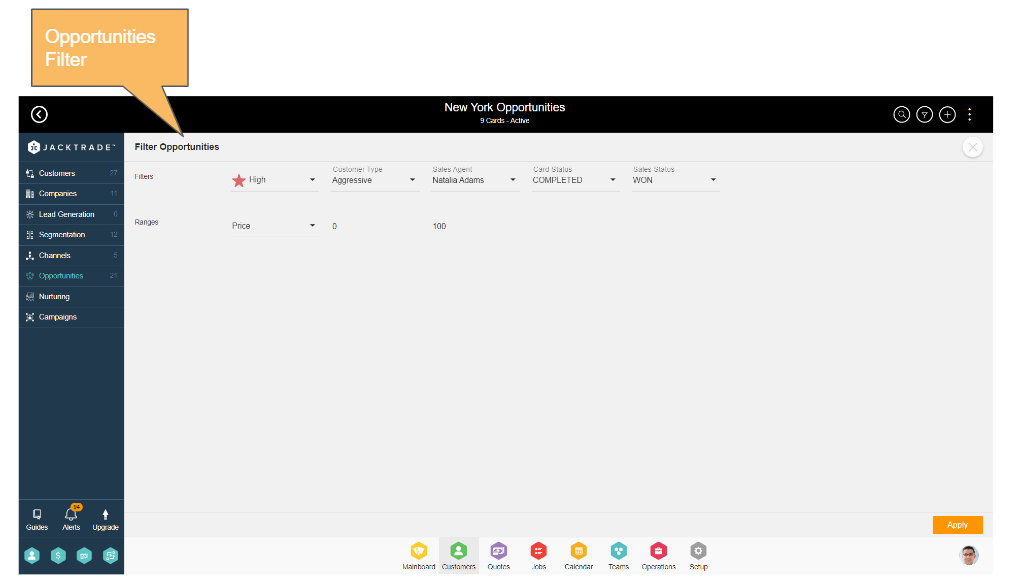
The opportunity board has filters that can be set as temporary permanent filters per resource. This works similarly to other filters in JT. Each board can be filtered individually, by selecting one of the following criteria:
- Age: this will filter the range of cards in days.
- Sales Agent: the cards are shown filtered on the basis of the sales agent selected.
- Potential Opportunity: the cards will be filtered based on the potential worth of each opportunity.
- Forecast Close: this will filter on the basis of the forecast close date of the cards.
- Chance of Sale: the cards will be filtered on the basis of the percentage of chance of a sale
- Updated: according to the date on which the cards were updated.
That’s all you need to know to leverage Jacktrade’s opportunity board to its best usage.
Managing Visuals
Visuals provide an easy way of identifying things on the opportunity cards. Visuals are set up per opportunity board and can be set up through the 3 dots menu on the top right in the card view. Jacktrade supports visuals for the following 2 things –
- Age Visuals – The system sets up 4 age visuals by default which users can choose to update. Age visuals are set up for the day’s range starting from the day of creation on the opportunity. By default, the 4 ranges set are 0-20 days, 20-40 days, 40-60 days, and 60 to 100 days. If the age goes past 100 days, it will still retain the visual for the 100th day.

Navigation Reference: Click on Option Menu → Manage Age Visuals
- Amount Visuals – Amount visuals are similarly set up to age visuals. The system by default sets 4 ranges 1000, 5000, 10000, and 15000, User can choose to update the ranges as well as the visuals.

Navigation Reference: Click on Option Menu → Manage Amount Visuals
Manage Labels
Labels can be set by the businesses per opportunity board. Labels help businesses uniquely tag the opportunities for visual differentiation. Multiple labels can be added per opportunity. Applied labels are visually represented on the opportunity cards.
Labels can be managed from the 3 dots menu in the cards view from the ‘Manage Lanes’ Option.
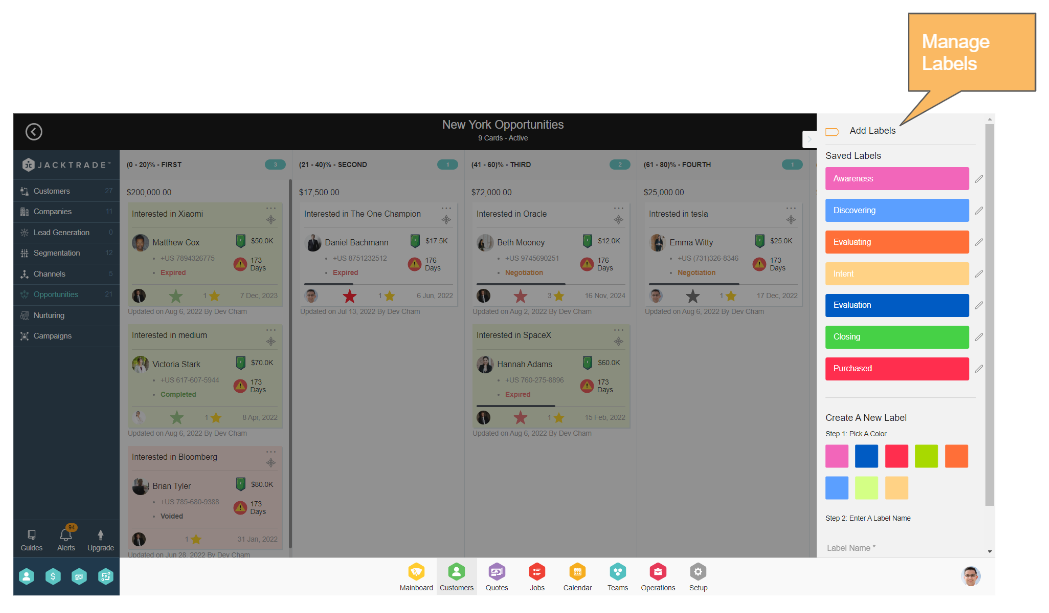
Navigation Reference: Click on Option Menu → Manage Labels
By default, seven labels are provided by the system –
- Awareness
- Discovering
- Evaluating
- Intent
- Evaluation
- Closing
- Purchased
Additionally, the business can choose to add more labels or even edit the existing ones. Each label is represented by a color and it is recommended to keep the label names and colors unique.
Manage Lanes
Swim lanes for the opportunity cards can be configured from the ‘Manage Lanes’ option in the 3 dots menu on the top right of the opportunity cards view.

Navigation Reference: Click on Option Menu → Manage Lanes
Opportunities are set in the lanes based on the ‘Win Chance’ of the opportunity. The lanes can be split based on the win percentage and the total percentage has to be 100%. For example – you can set up 4 lanes with a win percentage of 25% each or 5 lanes with a win percentage of 20% each.
Win Chance Alias
Jacktrade provides an ability for businesses to set up an alias for ‘Win Chance’ as per their business needs. This alias will show up on the opportunity cards.
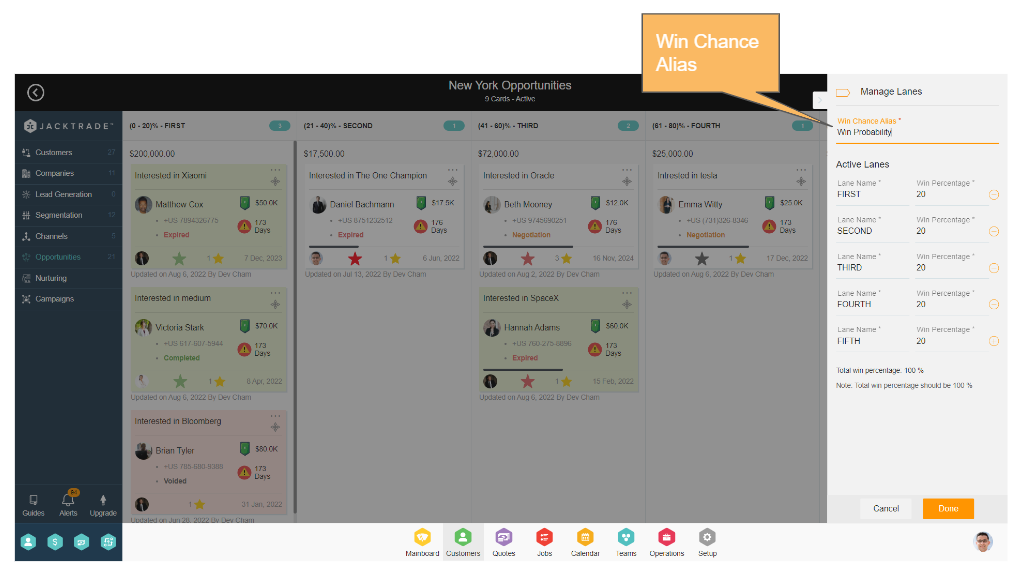
Navigation Reference: Click on Option Menu → Manage Lanes
Setup Priorities
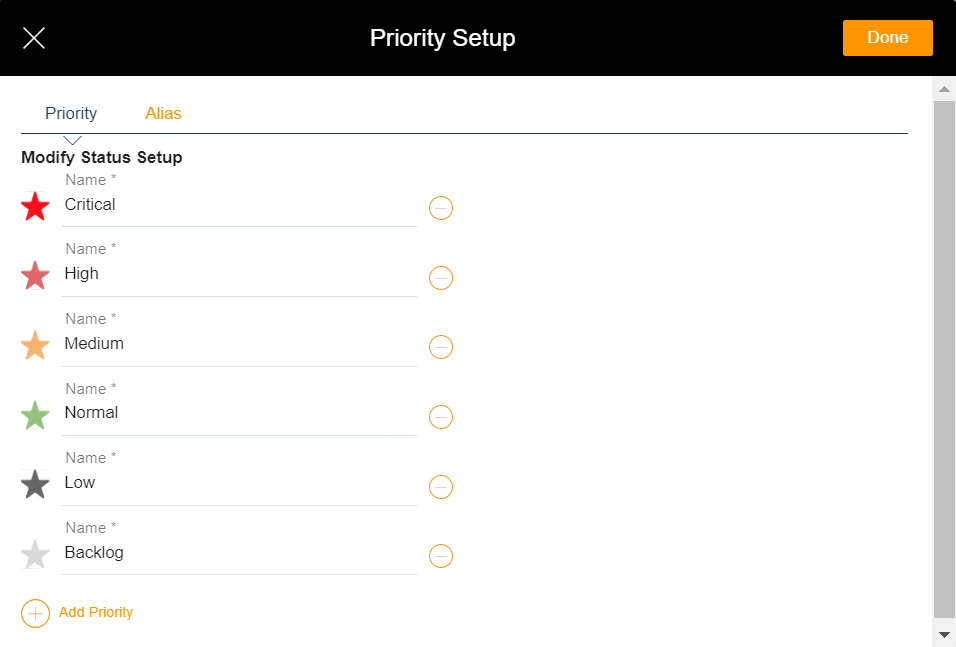
Priorities help the teams to tackle the opportunities. Businesses can choose to set up multiple priorities per opportunity board. Priorities can be set up in the ‘Setup Priority’ option in the 3 dots menu on the top right. By default, six priorities are set per board –
- Critical
- High
- Medium
- Normal
- Low
- Backlog
Each priority is represented by an emoticon. It is recommended to set up unique priority names and emoticons for visual differentiation.
Productivity Quadrant Setup
The productivity quadrant includes alias for the following –

Name Alias –
- Authority
- Need
Measurement Alias
- High
- Low
New Badge Setup
A new badge shows up on the opportunity cards when a new opportunity is created. This helps the business users to identify newly created opportunities in the business. This badge shows up for a certain number of days since the creation of the opportunity. The number of days is configurable and by default, it is set to 5 days by the system.

Navigation Reference: Click on Option Menu → Setup Priority
Learn More About – ‘How To – Add an Opportunity‘ and ‘How To – Configure Sales Pipeline‘

