Building A Smart Notification
Trigger emails, although personal, are easily automated and can be sent to customers for multiple actions: before-selling, during-selling, up-selling and cross-selling, welcome, re-engagement, and the list goes on. Also, depending on your business, there are several special cases for sending great trigger emails. A clever use of behavior triggers is expertly timed and implemented reminder that your company is there and has value for the customer.
Jacktrade installs pre-configured notifications for you when you sign up. Additional Smart Notifications can be added easily through your Business Setup. Notifications are easy to configure in your Automation setup. You will need to know the details of the smart notifications functionality which can be simple or can get complicated.
Let's get started with an overview of what you will find on each tab when adding or updating notifications:
- Notification Logic Triggers - This is about ‘how’ and ‘what’.
A fundamental set of rules that set up how a notification will get triggered, and what will be sent based on those triggers.
- Assign - This is about ‘who’.
Assign a functional user like a customer, a resource assigned to the function being targeted like Quotes, or assign a specific resource from your team.
- Due Date - This is about ‘when’.
Many functions in Jacktrade have due dates like Action Items, Service Deliveries, Opportunities, etc. Once a due date attribute is picked, it can then be used to trigger logic based on the age from that date. You can set up notifications to trigger before (pre-date) or after (post-date) a specific due date.
- Data attribution logic - This is about ‘which’.
Focuses on which data should be selected for triggering notifications. This is set up by picking data attributes and the logic simply matches data with corresponding data values.
- Tags - This is about ‘which’ again.
Tags offer you flexibility when you need to have the freedom to dynamically decide which data to trigger logic on. You can set tags in your notifications, and when they get added to your source functions, they will then trigger matchable notifications. Note timing of the notification may not be immediate - it may take anywhere between 1-4 hours to get that notification out.
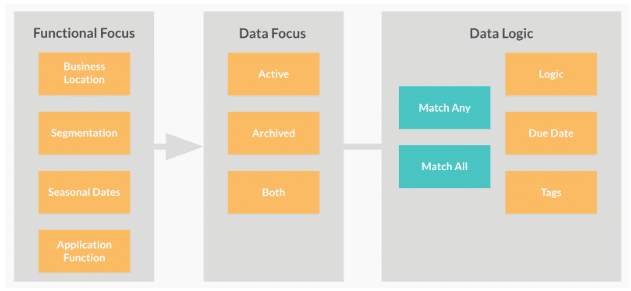
We will look through all of this in detail in the next few sections. The diagram below provides the context of inter-connection within the rules of a notification. Feel free to refer back to this diagram if you need to.
Start With Notification Details
In this tab of building your smart notification, you will
- Name your notification, and assign fundamental structure to it like customer segment, business locations, etc
- Organizing your notification.
- Define functional categories including how you want the logic to work together.
- And, finally, the content related to the notification.
We will dive more deeply into all of this so let's get started.
Notification Fundamental Structure Setup
You start your notification setup by assigning fundamentals that are focused on the top-level configuration of a notification logic. You start setting up notifications by providing the following information:
- Notification Name - Simply put a meaningful name here so that you can understand what the notification is about.
- Description - Write a description of your notification, and we suggest you write a simple description of the logic you are trying to build. The description is not shared as part of the notification.
- Business Location - You know well by now, that each notification is dedicated to that business location. This is not only important to distinguish your messaging per your business location, but also important as the sender information is used based on your email sending settings. If you have the same notification to be built for every location, simply add a notification with the same logic for each location.
- Apply to segmentation - To group your notifications to certain customers, you may choose to segment your customers. This depends on who and how you are communicating. If it's a repeat customer, you may want to choose to write a message that welcomes them back. Or, if it's a brand new customer, or if it's a potential buyer with high order value - you can decide the way you want to segment and deliver your communications. Sending to all your customers and not grouping them at all can be simply set up in your segmentation module.
- Enabled From and Enabled To - You can enable targeted notifications to your audience on a specific date like Thanksgiving, Memorial Day, Independence Day, Christmas Day, etc. Use this to wish your customers happy holidays and keep in touch with them - just set the ‘Enabled From’ and ‘Enabled To’ to be on the same day. You can always schedule your notifications a year ahead.
Organizing Your Notifications
Organizing your notifications is going to be important when you have a lot of them. This configuration does not build any logic for your notifications to trigger - this information is primarily focused on organizing your notifications.
- Notification target category - Pick who you are targeting for your notifications. Values available to you are - Customers, Teams, Partners, or Mixed Targets.
- The emotional focus of this notification - Each notification has to have its purpose and drive an emotional outcome. We like to suggest that you look at all the emotions you like to represent in your message and build your notifications around them. Values available to you are - Value, Trust, Alertness, Fear, Urgency, Celebration, Surprise, Gratitude, General, or Other
- Set action type - The way we look at events in business - either you are proactive or reactive, and you can design your notifications around them as well as drive any emotional focus you desire - urgency, alertness, escalation, you get the point. Values available to you are - Proactive or Reactive.
Main Notification Focus
- Apply to Function - Pick a function you want the notification for among the choices you have Quotes, Quotes Services, Quote Meetings, Jobs, Jobs Services, Job Meetings, Opportunities, Purchase Orders (coming soon), Warranty Tracking (coming soon).
- Trigger On-Time - Determine in what time range you want to trigger your notification to be sent. Trigger emails have a 152% higher open rate compared with traditional emails. They are a valuable communication tool and convert window shoppers into lifelong customers. Behavior-triggered emails are real-time reactions to how your customers are using your product. When Facebook emails you because you haven’t logged in for 5 days, that’s a behavior-triggered email. They work amazingly well. If you aren’t using them already, you should be!
- Match Settings Among - Pick a choice of how you want the match settings between Logic, Due Date, and Tags
- Match Any - will match any condition between these three setups. For example, if it matches ‘tag’ data, it will then just simply match that condition. In another example, if you wanted to match both status A and B for Quote, then the notification will be sent if your source data matched any of these conditions.
- Match All - picking this condition will let to match all conditions between these three setups. For example, if you want to match the status and age of the due date. This will end up matching both data sets. In another example, if you added a tag to it, then the smart notification will also look at the tag to match along with other rule sets.
- Query Data On - Configures on which data you want the system to query the rule set. You can choose to query it on the active functions, archived functions, or both. A few points on data to manage:
- Sends to New Data Only - Any notification you create will only look at data from the point of creation onwards. No previous data will be utilized for notification matching avoiding a possible avalanche of notifications based on previous data. You can focus on data that is active, archived, or both. Remember, only after the creation of your smart notification, can you trigger a notification when you archive your data - a notification will not be sent to old archived data. An example of archive data is: if you canceled a Quote, you can archive (store it away) it to keep your Quote list clean
- Send Once - Once a notification is sent with a rule set in the particular smart notification it will not be sent again. This rule is maintained on the high functional level like Services, Meetings, Quotes, and Jobs. For example: If you applied the trigger to be sent to Quotes - then anything that changes within that Smart Notification will not be re-sent for the same function ID
Set Notification Type
Setting notification type lets you allow the mechanisms of sending the notification. Jacktrade supports sending smart notifications via Email, SMS, and within the Jacktrade app experience.
Sending Smart Notifications via Email
Sending a simple email to your recipient. A valid email address has to be present in the contact record. You can enter
- Email Subject - The subject line is the start of the readers’ experience with your campaign, and, in a world of increasing distractions, it can also be the end of their experience if you don’t make it captivating and engaging. Your subject line is what entices your reader to open your email and pursue the information inside, so it’s important to put some serious thought into this portion of the writing process. So, make sure you write a good subject line that grabs users' attention.
- Insert Emoji in Subject Line - Guidelines for Emoji Use in Subject Lines. Based on these findings, we can suggest several guidelines for the use of emojis in subject lines.
- Do not add emojis in email subject lines purely to jazz them up to draw users’ attention. Even though an emoji may attract attention, it may make users see your email as less valuable and look more negatively at it, and by association, at your organization.
- Only use emojis in instances where they will truly add value by providing context or relevant emotional value.
- Even if your use of emojis is legitimate, be selective about how often you send out emoji emails. We’ve seen that emoji subject lines may attract attention compared to no-emojis due to their visual qualities, but if every email in the inbox has an emoji, there won’t be any benefit. So use them sparingly so that you can benefit from them occasionally. Plus, it’s best not to continually push out content that could be perceived negatively.
- Overall, emojis seem to be a double-edged sword: they can negatively impact users’ attitudes, but they can also attract some attention and move the focus on the visual aspects of the email (which, in itself could be good or bad). Overuse will wipe out their benefits, likely leaving us only with the drawbacks.
Notification Content
Dynamic Data (Tokens) For Notifications
Data tokens help you segment your audience based on custom criteria and allow you to create more relevant campaigns for your subscribers. For example, you can segment your mailing list by gender — male and female, preferences — red and blue, and region of residence — London and New York.
Select a token and set the criteria based on which a subject will be added to the email.
For example, if the value of the {{Name}} data token is empty, then use the text "We have good news for you!", otherwise use the text "{{Name}}, We have good news for you."
You can use smart personalization in
- a subject line
- a text body
Smart Personalization
You can add a condition to a text body while creating a campaign. You can do this in featured templates, the template builder, and the HTML editor.
Put the cursor in the desired place in a template.
Click the "Add criteria" button in the toolbar.
Select a data token and set the criteria based on which the text will be inserted in the email.
For example, if the value of the {{City}} data token equals "New York," then use the text "Free shipping on the same day," otherwise use the text "Shipping within 5 days."
Selecting Segmented Customers
Segmentation helps you take into account the engagement and preferences of your recipients to work with each of them individually.
You can select contacts by statistics of opens and clicks to create activation campaigns.
Segmentation allows you to create smart notifications that are exclusive to a specific type of customer. You can use segmentation based on subscribers’ demographics, firmographics, profile tags, etc. Send campaigns separately to men and women living in different cities, who prefer different products, or say hello to a high amount order to let customers know that they got your CEO’s support.
The more important thing to know is that segmentation with Smart Notifications takes you even further into personalization, and the sky is the limit on how this can be used to provide a cool differentiation from the rest of your competitors.
Restricting Customer From Sending Smart Notification
In case you like to self-restrict a customer from not receiving a specific campaign - then you will simply go to a specific segment associated with EMail marketing, and add the email address to the restricted list. Note, that the email will only be restricted from that segment and not necessarily any other segment. You may want to go to each segment and restrict specific customer email addresses. Hopefully, you will never have to do this.
Assign Recipients
Setup recipients to whom you wish to send out the notifications.
- Customers (primary) as related to function
- Customers (secondary, if any) as related to function
- Resources (sales/primary) as related to function
- Resources (others) as related to the function
- Add Resources
Logic
In the logic tab, you will be able to configure different data logic and attributes that can help you craft your notification. You will deal with the following 2 types of configuration for your data logic that is important to set for your rule-matching
- Data Attributes - specific data that is integrated across your business
- Products Or Materials - specific products or materials configured for sales primarily in Quotes and Jobs.
Match Settings
Matching your data attributes within the logic means that you can trigger a Smart Notification if a combination or any data matches the criteria. There are two options available for you:
- Match Any - matches any single data for the notification logic to turn ‘true’ and process forward.
- Match All - matches all the data conditions for notification log-in to turn ‘true’
Add Attributes
An attribute is a data field, that defines a characteristic of a data object. The data attribute is used to store custom data private to your business in various functions. Jacktrade lets you build your rules by picking a data attribute and its values, for example, function Quote will have a data attribute called ‘status’ with specific values like ‘close’ or ‘complete’.
There are 4 different types of data attributes:
- Age-based - almost every function or profile has a status in Jacktrade, and this can
- Amount-based - any data related to the amount are exposed across all the supported currencies like “Total Price”.
- Data-based - fields that have data only are exposed like ‘Sales Agent’, or “Lead Source”, etc.
- Status-based - almost every function or profile has status in Jacktrade, and this can be very effective when informing or alerting your audience when states of certain processes change.
Add Products Or Materials
You can add specific product or material that you want notification rule to match to set Smart Notification rules to determine match. Product or Materials are available only when you choose Quotes or Jobs as your application to target.
Due Date
Due dates are important for functions that have data associated to them, for example, opportunities have deal date, Quote Services have start and finish date. Logic of due date works with two conditions
- Pre-Date - if you want to send ‘X’ days before the date. For example, if you want to send a notification 2 days before start of the Job Services.
- Post-Date - if you want to send ‘X’ days after to the date. For example, if you want to send a notification 2 days before start of the Job Services.
Remember, even though the logic says ‘Due Date’, the logic asks you to add a value which represents the number of days before or after the expected date.
Tags In Notifications
Picking the right tags that match your intended profiles has a lot of different advantages - so continue to read further as it can be a game-changer for you.
Adding Custom Tags
Custom tags are created by the user and you can use these to build more specific use-cases. You can pre-plan your tags add them to various modules and identify specific tags that would trigger a smart notification. For example: a custom tag ‘send white paper’ can be added to a profile, and Smart Notification can send content set up to that profile. You can semi-automate lots of communication using this method in case you need to send more targeted information as part of your business workflow or buyers' process. Pretty cool right?
Custom tags are available for the following modules in Jacktrade
- Customers
- Opportunities
- Quotes
- Jobs
- Products
- Materials
- Product Ordering
- Material Ordering
- Media
Adding System Tags
System tags are generated by the system and you can use these effectively because they will be consistently the same anytime the same service, product, or data is being used. Users of your application don’t need to remember to add tags manually and you can be sure that no notification will be dropped because someone on your team mistakenly forgot to tag the profile. For example: In Jobs, a system tag is automatically generated with a service name like “Job - Advisory Service” - every time you bill for this service, the same system tag will be generated for that Job.
System tags are available for the following modules in Jacktrade
- Opportunities
- Services
- Service Promotions
- Meetings
- Product Line Items
- Product Promotions
- Material Line Items
- Material Promotion