
Two-Way Sync Introduction
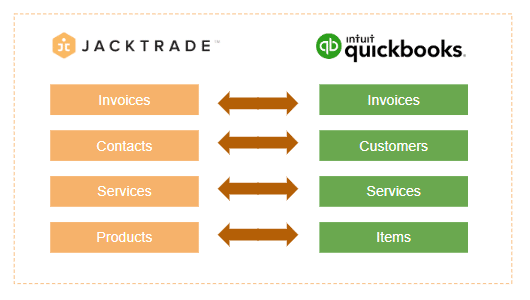
All the data related to finances is synced between Jacktrade and QuickBooks. This includes invoices, customer contacts, services, and product items. QuickBooks is cloud-based accounting software for managing sales, and expenses and keeping track of day-to-day business transactions in your business in one place. By integrating it with Jacktrade, you can sync all the data related to your finances between Jacktrade and QuickBooks.
Steps To Integrate QuickBooks With Jacktrade
Step 1 - Add your Quickbook account to Jacktrade
In Setup > Banking > Accounting, click on add to add a QuickBooks account to Jacktrade.
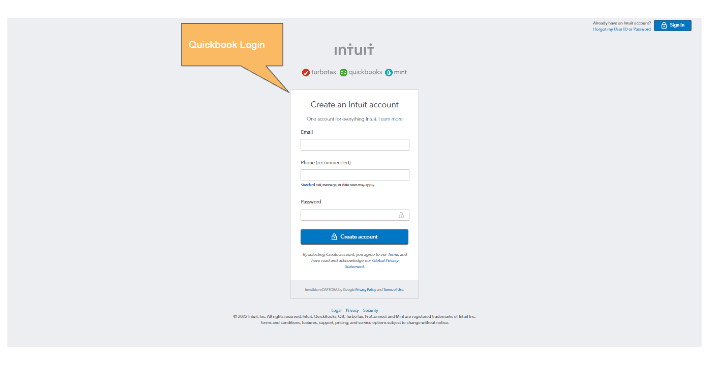
This is a two-step process. First, you need to log in to QuickBooks https://accounts.intuit.com/signup and sign in to your account. Once you have successfully logged into a Quickbooks account via Jacktrade, then continue to configure settings to enable sync with Quickbooks.
Quickbook Login
Step 2 - Configure In Jacktrade what you want to sync
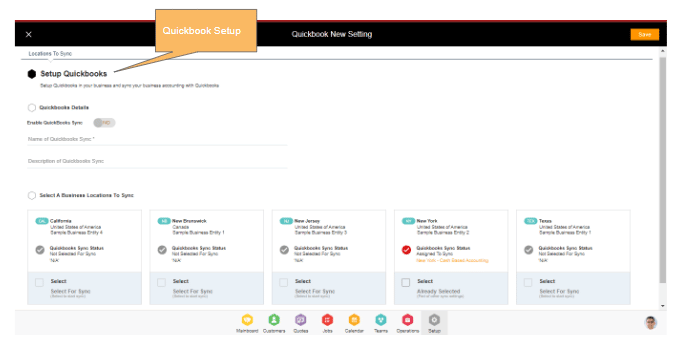
Add details required to create a QuickBook account sync in Jacktrade. This requires the name of the QuickBook sync. Jacktrade asks for the name of QuickBook sync because businesses can choose to sync multiple QuickBook syncs with a business location. Quickbooks sync can be set up globally for the business in settings. You can set up multiple QuickBooks accounts depending on how you set up your business - in setup, you can assign a particular business location within a currency region to sync data. Once a location is selected under one QBs setup - you will not be able to send data for the same location using another setup. Multiple business locations can be mapped with one setting. You will see check marks of different colors on the business location and each color represents the following -
- Grey - Ready to select
- Green - Already selected
- Red - Selected in Other settings/ Currency not supported/ Disabled location
Make sure you name this properly as this will be used to filter your transactions. A description for the sync can be added which is optional. Select the business location you want to sync data for.
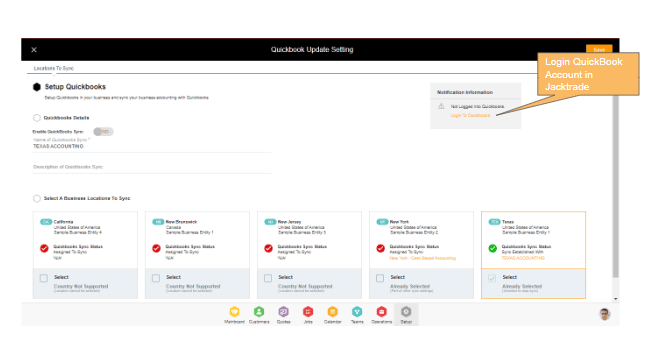
Step 3 - Add Quickbooks account to Jacktrade
Enabling the sync requires you to log in to QuickBooks. Go to the sync settings you created and click on ‘Login To QuickBooks’ under Notification Information. This will navigate you to the QuickBooks platform.
Step 4 - Connecting QuickBooks account with Jacktrade
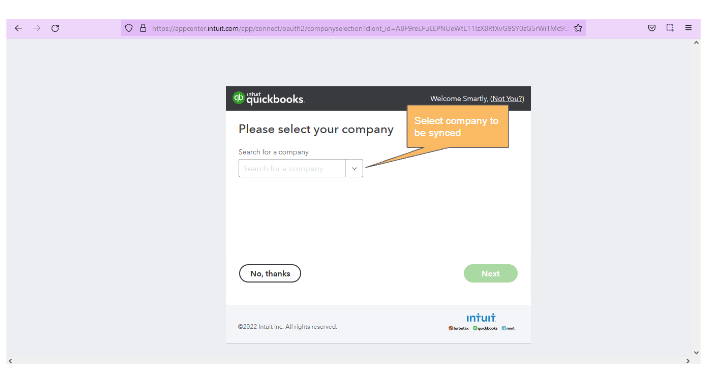
QuickBooks platform will take you through the wizard to select the company you want to sync data to.
Note: Make sure your currency matches the data in QuickBooks and the business location in Jacktrade.
After selecting the company and hitting ‘Next’, you will be navigated back to Jacktrade showing you that your connection is successful. Click on ‘Manage Configuration’ and you will navigate to the sync details.
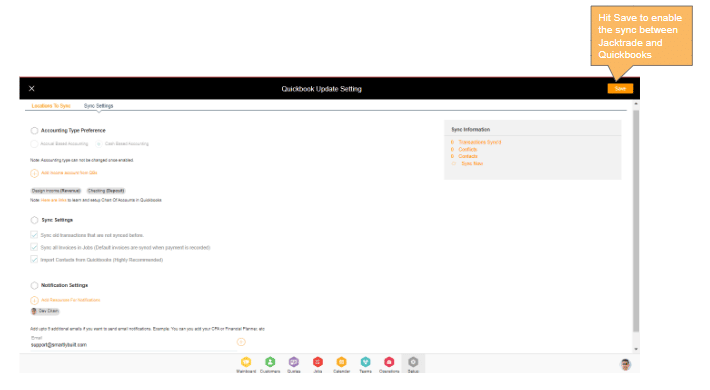
Step 5 - Configure your sync settings
Go to the Sync Settings tab on the QuickBook update settings page and setup the following
- Setup account type preference, if you want to sync Accrual-based accounting or cash-based accounting. Please note that - the accounting type cannot be changed once set here. If you want to update it, you need to add another Sync setting and disable or delete this setting.
- If you happen to select Accrual Based accounting, you need to update settings for inserting data in QuickBooks invoice. This includes -
a ) Insert the Customer Name in the memo field.
b) Insert Job ID in the memo field.
c) Insert Service Name in the memo field. - Add income accounts for QuickBooks. You can learn more about income accounts here - https://quickbooks.intuit.com/learn-support/global/chart-of-accounts/learn-about-the-chart-of-accounts-in-quickbooks-online/00/1023721
- Setup Sync settings based on your business requirements. These include -
a) Sync old transactions that are not synced before.
b) Sync all Invoices in Jobs (Default invoices are synced when payment is recorded).
c) Import Contacts from Quickbooks (Highly Recommended). - Setup Notifications settings. Here you can add up to 5 email addresses to whom you wish to send notifications for QuickBook updates. These emails would be generally from your CPA or financial partners.

Step 6 - Enable Sync between Jacktrade and QuickBooks
Once your settings are complete you can enable QuickBook Sync and hit ‘Save’. Your QuickBook is synced for the selected business location data based on the settings selected above.
QuickBooks Account List
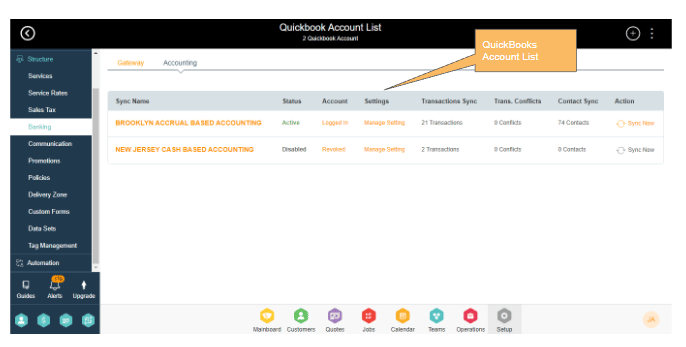
The account list in Jacktrade Quickbook settings shows all the QuickBooks accounts (sync settings) added. Let's understand what each of the columns here indicates:
- Sync Name - Name of the business account you want to sync. This is per business location and you need to make sure the business location and the currency in QuickBook match.
- Status - QuickBook account status in Jacktrade. This will be either enabled or disabled based on your settings.
- Account - Status if the business is logged into the QuickBooks account or not.
- Settings - Manage settings will navigate you to the account settings where you can choose to update the settings.
- Transaction Sync - This column shows the number of transactions synced for each of the accounts.
- Transaction Conflicts - This column shows the number of conflicts for each of the accounts.
- Contacts Sync - This column shows the number of customer contacts synced between QuickBooks and Jacktrade.
- Action - Jacktrade automatically syncs the data at regular intervals. If a business wants to sync any data instantly, they can choose to opt for this option which will instantly sync the data.
Transaction List
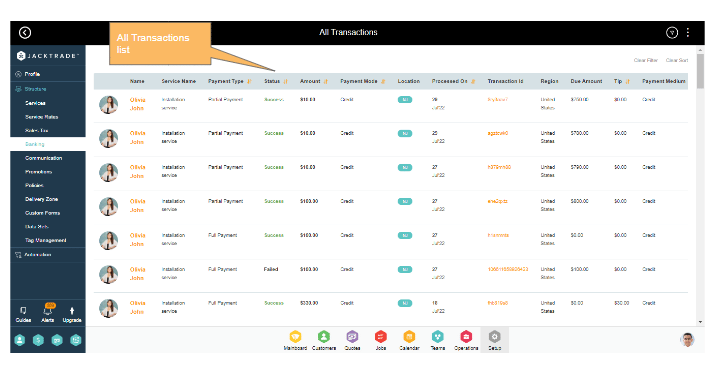
The transaction list is your go-to list to review all the transactions synced between QuickBooks and Jacktrade per Job Service. For every transaction, it will show the customer name, service name, type of payment, amount, mode of payment, Job location, payment processing date, transaction id, region, and due amount in that service during the transaction.
This list comes with robust filters enabling businesses to work efficiently. These filters include business location, payment type, payment status, and service name. It also provides a range filter for payment processed date and transaction amount.
Additionally, there is a multi-level sort of up to 3 levels on the transaction list. Sort is available for payment type, amount, payment mode, and payment process date.